Checkpoint firewalls vs. Azure Network Security Groups (NSGs)

Microsoft Azure

This post compares Azure Network Security Groups (NSGs) and virtual firewall appliances, specifically Checkpoints.

Azure Network Security Groups

Azure Network Security Groups, are the built-in firewalling mechanism in Azure, they allow you to control traffic to your virtual network (VNET) that contains your IaaS VMs (and potentially PaaS infrastructure such as App Service Environments – ASEs).

Network Security Rules are like firewall rule, they consist of

  • A name for the rule
  • A description
  • The direction of the rule e.g. Inbound if it applies to traffic coming into the VNET/subnet or Outbound if it applies to traffic leaving a VNET/subnet
  • An action, allow or deny.
  • Source address range
  • Source port
  • Destination address range
  • Destination port

The network security rules are then grouped together into NSGs. These NSGs are in turn either applied at the subnet level or to individual Network Interfaces (NICs) associated with VMs.

Even if you have not created any NSGs there are some default built-in system rules, these essentially block all inbound traffic (except from the Azure load balancer), allow all traffic within a VNET and all outbound traffic.

Checkpoint firewall architecture on Azure

Checkpoint firewalls on Azure are virtual machines running the Checkpoint software. However, to make use of Checkpoints you need a number of other Azure services in place. If you also want high-availability then you need a few more.

  • Azure VMs (the Checkpoints are deployed from the Azure Marketplace) – two if you want high availability
  • Azure Load Balancer (if you’re deploying them in a high availability configuration), with NAT rules
  • Azure Route Tables to direct traffic through the Checkpoints
  • An Azure AD Application and Service Principal – which is used by the Check to modify the Load Balancer configuration to direct traffic to the correct Checkpoint in the event the primary fails, modify the cluster public IP association and route tables.

Comparison

NSG Checkpoints
Complexity Low complexity – simply define rules in the portal, via the Azure PowerShell module or ARM templates. High – the checkpoints depend on a number of other Azure services. When there are issues it can be difficult to reason about where the problem lies.
Cost Low cost – there is not additional cost to using NSGs High cost – you pay for the VMs, Checkpoint licensing (including for any blades that you need), Azure Load Balancer, Storage used by the Checkpoint VMs and Public IPs.
Management overhead Low

There is no infrastructure to manage

High

You have to manage the VMs, update/patch the Checkpoint software, route tables and load balancer.

If you have a lot of VNETs and/or on-premise ranges, managing the Route Tables (and static routes on the Checkpoints can be a headache).

Scalability Relatively easy to scale

You don’t need to worry about scaling – the only limits you have are around the number of NSGs and rules per NSGs. The only problem is that you can easily hit those limits if you have to implement a default deny rule on outbound traffic and then whitelist Azure IP address ranges [**more on why this is required]

Difficult to scale

You are limited to two Checkpoints per cluster. In addition, the Checkpoints are in an active-passive configuration so only one can handle traffic the other is sitting idle burning cash.

Furthermore, since you cannot scale out this means the best you can do is scale up.

On the plus side you don’t need to worry about limits on the number of rules so you can easily whitelist the Azure IP ranges.

Features NSGs are currently limited to traditional firewall rules. If you want other capabilities such as Web Application Firewall (WAF), you would need to use the WAF capabilities of the Azure Load Balancer. You can use all the features (blades) that Checkpoints provide such as WAF, IPS etc.
Automation NSGs are highly automatable you can automate the management of such rules via PowerShell and/or ARM templates. Automating Checkpoint deployments is far more complex since it involves VMs, Load Balancer and Route tables.

Furthermore, when it comes to implementing the rules – as far as I am aware there is no API or PowerShell module for Checkpoints. The closest thing   available is a command line tool is dbedit.

High Availability Comes for free with NSGs – it’s a distributed service. HA is far more complex with Checkpoints – and complex systems are harder to make highly available.

The Route Tables and static routes on the Checkpoints can make this a fragile solution.

Disaster Recovery Microsoft are effectively responsible for this.

That said you can keep NSGs rules stored in your version control system so should you make a mistake it should be easy to rollback (and identify the breaking change as well as have an audit chain of what was changed)

There is no DR solution – as while your Checkpoint management servers hold (most of the configuration so you can redeploy the config), in a DR situation if you lose a Checkpoint VM you have to rebuild it and reconfigure the cluster which requires a lot of manual effort (you can automate some of this at least on the Azure side but not everything).

It should be noted that there have been a number of announcements at Ignite 2017 that will simplify NSG rules such as Application Groups, Service Tags and Augmented Rules.

The two most common reasons I hear why an organisation wants to use Checkpoints (or another virtual firewall appliance for that matter) in place of NSGs are:

Skills: we already use Checkpoints on-premise so it’s easier to manage those from a skills perspective

The way that Checkpoints work in Azure today I think this is a fallacy. While yes it’s true your network, security (or whichever team manages your firewalls on-premise) will be familiar with how to configure rules on Checkpoints there are some fundamental differences, namely they are unlikely to be familiar with:

  • Azure AD Applications
  • Azure Load Balancer
  • Azure Route Tables
  • Managing VMs on Azure

Security/features are better with Checkpoints

This is mostly true in the sense that you can bolt on WAF or IDS/IPS capabilities to a Checkpoint and manage this through a “single pane of glass”. NSGs are (currently – I think this will change) more rudimentary in comparison.

That said you are in a sense increasing your attack surface as you must manage the Checkpoint VMs. In addition, because Checkpoints on Azure have so many moving parts in my view it’s far easier to make mistakes and create a vulnerability/security risk. Such as misconfigure your Route Table such that traffic is not filtered by your Checkpoints. In addition, you also must safe guard the Azure AD application credentials (which are stored in cleartext on the Checkpoints) as it is used to modify the route tables, load balancer, public IP associations.

NSGs are hard to troubleshoot as it’s provided as a service

Since Checkpoint rules are typically managed through a management server from a GUI it is believed this makes it easier to troubleshoot issues. This is true in that it’s easier to capture traffic going through the firewall and determine if the firewall is accepting or denying traffic. However, things are not so simple in the real world – if you have issues with return traffic e.g. route tables it becomes far more complex. You can’t easily troubleshoot as you normally would have by installing the Network Watcher on the Checkpoints because they are third party appliances.

NSGs used to be hard to troubleshoot, but now you can setup NSG logs to be stored in Azure Storage, look at the effective security rules applied to NICs to determine if traffic is allowed, use Network Watcher to capture traffic.

I can’t meet audit requirements with NSG

Before the advent of NSG logs and Network Watcher this used to be true but not anymore – with these solutions you can retain NSG logs for audit purposes and to meet other requirements (such as feeding them into a SIEM or IDS/IPS).

You can also export logs (yes this does require more work than it would have with Checkpoints) to your SIEM or log analytics tool, for example NSG logs / Network Watcher data can be fed into Splunk.

Summary

This is not to say that Checkpoints on Azure are not a good solution – what I am saying is that you need to understand the trade-offs that you are making in using either NSGs or a virtual firewall appliance such as a Checkpoint.

The idea of perimeter security is slowly giving way to other more modern approaches that involves applying network security not just at your network edge but network security policies that apply at the node (e.g. server, container etc). level. Similar to network security policies available in the containerisation world. In fact, in the cloud this model is makes far more sense than the old perimeter security model.

 

ADFS WAP behind Azure Application Gateway

Microsoft Azure

Some time ago i wrote up a post (located here) explaining how you can setup traffic manager with ADFS and have proper monitoring of the service. Today i will go over how to setup ADFS behind the Azure Application Gateway. This will enable you to protect your ADFS service and monitor it with the WAF provided by the application gateway.

Before we begin one prerequisite which i am still not sure if its really needed but i had problems and i believe this fixed it:

You need to set the default HTTPS Binding, i believe this is required as i am not sure if the health probe is truly SNI compliant, i might be wrong here but it doesn’t hurt to set this. To set it you simply need to run the following command on the WAP servers (just change the cert hash):

Ones that’s done create a Application gateway in Azure and do the following:

  1. Create a Frontend listener with thew following settings:
    • HTTPS Protocol
    • Listen on port 443
    • Multi-Site type, you can do basic but that will limit your application gateway to only the ADFS service for port 443
    • Provide a PFX file of your ADFS certificate. make sure you include the private key and a strong password
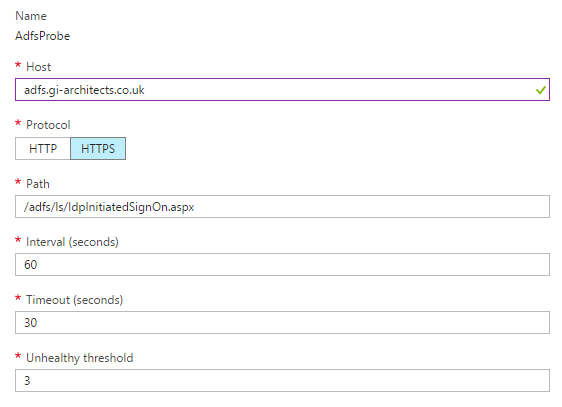
  2. Create a Health Probe with thew following settings (just change the host):
    • The path (so you can copy and paste): /adfs/ls/IdpInitiatedSignOn.aspx
  3. Create a HTTP Setting with thew following settings
    • HTTPS Protocol
    • Cookie based affinity: Disabled (you really don’t need that for ADFS)
    • Port 443
    • Export your ADFS certificate as a base 64 format (do not include the private key) and add it.
    • Tick the “Custom probe” and select the probe we created earlier
  4. Create a Backendpool which includes all your WAP servers
  5. Crete a Basic Rule using the objects created earlier.

And that’s it, this is not only a secure solution but it will give you a proper monitoring of both the WAP and ADFS servers. Works great with loadbalancing between on-prem and Azure.

Azure Public IP Ranges and Whitelisting

Microsoft Azure, Powershell

Introduction

The default Network Security Group rules in Azure allow any outbound connections to the Internet. For most security conscious organisations this is unacceptable and they must implement default deny rules that override the Microsoft defaults, then only explicitly allow outbound traffic where necessary.

The problem with putting in a default deny is that it breaks various functionality such as the VMAgent being able to report health-status to the Azure platform which is then reflected in the portal, the ability to reset VMs, use custom script or basically any type of VM extension. It can also break other Azure services.

NSGs have convenient tags for the VirtualNetwork, AzureLoadBalancer and Internet – unfortunately there are no built-in tags for various Azure regions or particular Azure services, nor is there a
way to create your own custom tags (e.g. akin to object groups such as those you have with Cisco or Checkpoint firewalls) – so today there is no easy way to do this.

This post discusses using a list of Azure Public IP ranges that Microsoft publishes and using that to whitelist those IP addresses.

Azure Public IP List

Microsoft publishes a list of all the public IP addresses used across the different Azure regions – you can use this to create NSG rules to whitelist those IPs.  You can download this list from here https://www.microsoft.com/en-gb/download/details.aspx?id=41653, the IPs are organised by
 region and provided in XML format. This file covers Azure Compute, Storage and SQL – so it doesn’t cover absolutely all services.

Downloading the file using PowerShell

 The PowerShell code below, retrieves the XML file and saves it locally:
 The function takes two parameters:

  •  The destination path where the file should be saved
  • An optional parameter that specifies the download URL, if not specified it uses a default value

 Return regions in the XML file


  The PowerShell function below returns the regions that the XML file covers by parsing the XML:

Return the IP addresses for a particular region

 The PowerShell function below takes the XML file and a region name, it then depending on the parameters specified:

  • Prints the IP addresses for the specified region to the screen
  • If the OutputAsNSGAllowRuleFormat switch is specified the results are output in the format of NSG rules (as a CSV). This switch requires that the NSGRuleNamePrefix parameter is specified, which is used to prefix the NSG rule names.
  • If the OutputAsIpSecurityXMLFormat switch is used it outputs the IP addresses as IIS IP Security rules XML
  • If the OutputAsCheckpointObjectGroupFormat switch is used it causes the IP addresses to be output in Checkpoint firewall network object group format.

You can then for example use the NSG rule format CSV file and use a PowerShell script to apply the rules – you might want to do this in an automated fashion since some regions have hundreds of IP addresses in this file.

NSG Limits

This brings us to another problem, we can’t create custom tags with NSGs, you can have a maximum of 400 NSGs each containing a maximum of 500 rules per NSG – and you can only have one NSG associated with a Subnet (or NIC). This is problematic because if you’re accessing resources across multiple Azure regions – there is no way you can cover all the IPs and stay within the limits. One option is not to be specific about the ports you allow and just allow ALL traffic to the Azure IPs but you will still reach the limits.

  So what options do we have?

  •  Don’t use NSGs and use a virtual firewall appliance such as a Checkpoint, Barracuda or Cisco appliance.
    • These are not subject to the same limits and support the use of object groups which can simplify the rules.
    • This of course is a costly option because NSG rules are free, where as the appliances will incur a per hour VM cost , plus a software license cost. 
    • Furthermore, you now have to design for high-availability for the appliances and scaling them up to handle more traffic (most of the  options as far as I am aware only support active-passive configuration and do not support load sharing between appliances). 
    • To add to this you also have to manage routes to direct traffic through the appliances – all of which add complexity.
  • Summarise the Azure IPs – while this can be an effective way to stay within the NGS limits, this does mean that you might end up allowing IPs that are outside of the ranges owned by Microsoft and increases your exposure.

 Summarising IP ranges

 If you decide to adopt the approach of summarising the Azure Public IP ranges, you can use the following Python script (which uses the Netaddr module to summarise): https://github.com/vijayjt/AzureScripts/blob/master/azure-ip-ranges/summarise_azure_ips.py

Azure RBAC Custom Roles

Microsoft Azure


Introduction

Azure supports Role-Based-Access-Control (RBAC) to controll what actions a principal (user, service principal etc) can perform via the Azure Portal, XPlat Cli or Azure PowerShell module.

Azure provides quite a few built-in roles (48 at this time) but it is also possible to define your own custom roles. In this post I will provide a few general tips on RBAC and also how to go about creating your own custom roles.

Actions and NotActions

Actions are permissions/operations that you wish to allow and NotActions are ones that you wish to restrict. When assigning roles you need to be conscious of the fact that NotActions are not deny rules as mentioned in the Microsoft document:

If a user is assigned a role that excludes an operation in NotActions, and is assigned a second role that grants access to the same operation, the user will be allowed to perform that operation. NotActions is not a deny rule – it is simply a convenient way to create a set of allowed operations when specific operations need to be excluded.


View a list of the built-in roles

You can use the Get-AzureRmRoleDefinition cmdlet to view a list of built-in roles:

View a list of the custom roles

You can view the list of custom roles (ones that you have created) available in the currently selected subscription by using the -Custom switch of the same cmdlet.

How to view the possible operations for a particular resource

When you are creating your own roles, you might want to see all the possible operations that can be permissioned for a particular resource type. In the example, below Microsoft.Sql/ represents Azure SQL Database and we use the Get-AzureRmProviderOperation cmdlet to search for all operations that begin with Microsoft.Sql/.

Creating a custom role

There are two ways to create a custom role .

  1. Write a role definition in JSON as shown in the Microsoft documentation; or
  2. If there is a built-in role close to what you need you can create a custom role based on an existing built-in (or indeed another custom role) and just modify the actions/notactions.

If you have a JSON role definition file you can create a new role definition using the command:

The PowerShell code below shows how you can create a custom role based on an existing one:

NOTE

There are two important points to be aware of when creating custom roles:

  • A custom role defined in one subscription is not visible in other subscriptions.
  • The role name must be unique to your Azure AD Tenant – e.g. if you want to use the same role definition across different subscription you will need to use a different name in each subscription – yes this is a pain and could cause some confusion.

Scopes

As you may have noticed from the code snippet above roles can be applied to multiple different scopes e.g. at the subscription level, resource group level or to an individual resource.

It is important to remember that access  that you grant at parent scopes is inherited at child scopes.


Modifying an existing custom role

The simplest way to modify an existing custom role is by retrieving the role definition via Get-AzureRmRoleDefinition and storing it in a variable, then adding/removing actions or changing the scope as required, and finally applying the changes with Set-AzureRmRoleDefinition.

Example custom roles

I have added a few example custom roles to my GitHub repo here:
https://github.com/vijayjt/AzureScripts/tree/master/rbac/role-definitions

The only thing you’d need to change is the assignable scopes in order to make use of the role definitions.

There are only two roles in the repo at the moment:

  1. A custom virtual machine operator role: I created this role to meet a requirement I had to allow particular users to start/stop/restart VMs in a particular resource group
  2. A custom limited subscription contributor role: this role was created to remove some types of sensitive operations from a subscription contributor. Of course what you deem as sensitive will change based on your context and the users involved. The custom role just adds sensitive operations into the NotActions. Ideally you should use more specific roles and scope the appropriately – but you may be asked to provide such broad access. One of the problems with this approach is new resource types are added frequently that may be sensitive so you have to constantly update the role definition.

ARM Template Plaster Template Manifest

Microsoft Azure

Plaster is a template-based file and project generator written in PowerShell. It is commonly used to create the scaffolding for the typical directories and files that are required to create a PowerShell module. However, it can also be used to create the scaffolding for a typical ARM template e.g. azuredeploy.json,  azuredeploy.parameters.json, metadata.json files, Pester test script etc.

You can find an example Plaster manifest for creating the scaffolding for an ARM template here in my Github repo https://github.com/vijayjt/PlasterTemplates/tree/master/AzureResourceManagerTemplate.

Azure ARM Templates and Testing with Pester

Microsoft Azure

I have been recently working with Azure Resource Manager (ARM) templates and using Pester for testing. My friend Sunny showed me a very basic example of using Pester for testing an ARM template that is available as part of a template for VM Scale Sets managed by Azure Automation DSC. The pester test script provided with this template does a few things:

  • Tests that an azuredeploy.json file exists
  • Tests that an azuredeploy.parameters.json file exists
  • Tests that a metadata.json file exists
  • Tests that the azuredeploy.json has the expected properties

This is a good start but in this post I will walk through some additional types of tests that you can run and also some gotchas I found with the example in the Azure Quickstart templates Github repo.


Checking for expected properties in a JSON file


The example in the Azure Quickstart templates Github repo uses the code below to check for expected properties:

There is a problem with this code in that the order in which the properties are returned through the line with the ConvertFrom-Json cmdlet may not match the order used by the expectedProperties variable. This issue can be solved by simply sorting the properties when you store them in the expectedProperties variable and also after the call to Get-Member.

Dealing with multiple parameter files


Another shortcoming of the example is that it assumes only one parameter file per template, so how do you deal with multiple parameter files? e.g. azuredeploy.parameters.dev.json,  azuredeploy.parameters.test.jsonFirst we need to modify the test that checks for the existence of parameter files to allow for multiple files like so:

Next we need to deal with multiple parameter files when checking if parameter files have the expected properties. To do this at the top of the test script we create an array hashes of all the parameter files.

Then we put the tests for parameter files in a separate context block and use TestCases parameter for a It block.

Testing a resource has the expected properties

We can extend the method used to check that a azuredeploy.json template file has the expected resources to also check that the resource has the expected properties. In the example below, we first check that a the azuredeploy.json contains a virtual network resource, then we check the virtual network has properties for address space, DHCP options and subnets.

Validating Templates

Another test we can add as part of our Pester testing script is to use the Test-AzureResourceGroupDeployment cmdlet to validate the template with each parameter file.  This requires creating a resource group.

When creating a resource group you should try to randomise part of the resource group name to avoid clashes, so for example you could use something like:

Here we use Pester-Validation-RG to easily identify what the purpose of the resource group is. We then prefix this with the first 5 characters from a GUID – to avoid clashes in the event you have multiple users or automated tests running at the same time in the same subscription.

We can then use the BeforeAll block to create the resource group before running the tests and the AfterAll block to delete it after all tests have run.

We then run Test-AzureResourceGroupDeployment with the template and each parameter file in turn uses the TestCases parameter for the It block.

There are few things to note with this:

  • It obviously requires that we create a resource group – because although the Test-AzureResourceGroupDeployment cmdlet doesn’t actually create the resources in the template it requires a resource group in order to use it.
  • While there is an AfterAll block block that deletes the temporary resource group that is created to validate the template, if you Ctrl-C the test script or there is some other problem e.g. such as a corrupted test group stack it may not clean up your temporary resource group.
  • Note the deployment of the template can still fail – this simply checks that the schema for each of the resources is correct and that the parameter file is correct. Deployments can still fail for other reasons and the parameter file may still be wrong e.g. we specify a subnet address prefix in the parameter file that does not fall within the VNET address spaces
  • This will increase the time it takes for the tests to run because creating and deleting a resource group, even if it’s empty takes a little time.

Azure ASEs ARM Templates and resourceGroup.location() function

Microsoft Azure

In a recent post I wrote about Azure App Service Environments (ASEs) and AD Integration. If you look at the Azure Quickstart template for a Web App in an ASE, you will notice that the location is passed in as a parameter instead of using the resourcegoup.location() function. This is because there is a known issue where the backend infrastructure for ASEs is not correctly handling the location string returned by this function call. This is mentioned in the following stackoverflow article http://stackoverflow.com/questions/42490728/azure-arm-cant-create-hostingenvironments-location-has-an-invalid-value.

Azure App Service Environments (ASEs) and AD Integration

Microsoft Azure, Powershell

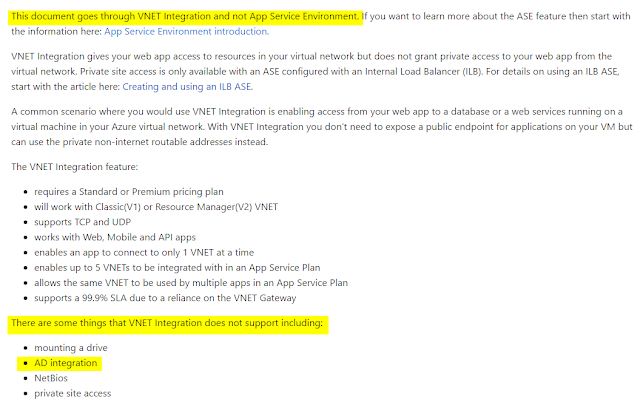
Recently I had to look at a case where there was a requirement to communicate with an Active Directory Domain Controller from a Azure Web App. We were looking to use App Service Environments, looking at the documentation published here https://docs.microsoft.com/en-us/azure/app-service-web/web-sites-integrate-with-vnet,it stated:

This caused some confusion as it appeared to suggest you could not communicate with domain controllers but it appears this is actually more in reference to domain joining.

Furthermore, there is a Microsoft blog post on how to load a LDAP module for PHP with an Azure Web App – which indicates that it is a supported scenario.

You can relatively easily verify this by deploying an Azure Web App with VNET integration or in ASE. I used a modified version of the template published here https://github.com/Azure/azure-quickstart-templates/tree/master/201-web-app-ase-create to create a Web App in an ASE.

I then created a domain controller via PowerShell in this Gist:

Then I used the PowerShell code in this Gist to install AD related roles and promoted the server to a Domain Controller via an answer file – change the forest/domain functional level and other settings to suit your needs.

At this point you can perform a rudimentary test of AD integration via Kudu/SCM PowerShell console.

If you wish to test using PHP, you will need to download the PHP binaries from http://windows.php.net/download/, and extracted them on my computer, in the ext directory you will find the php_ldap.dll file. Note the version you downloads needs to match the version of PHP you have configured your Web App with, which in my case was 5.6.

Next from Kudu / SCM I created a directory named bin under /site/wwwroot, in that directory. Then using FTPS (I used FileZilla, but you will need to create a deployment account first) to upload the php_ldap.dll file.

Then create a file named ldap-test.php with the following php code:

If you then browse to your web app domain and the file e.g. http://mywebapp.azurewebsites.net/ldap-test.php

Auditing Azure RBAC Assignments

Microsoft Azure, Powershell

I recently had a need to create a script to generate a report on Azure RBAC role assignments. The script does a number of things given the domain for your Azure AD tenant:

  • Reports on which users or AD groups have which role;
  • The scope that the role applies to (e.g. subscription, resource group, resource);
  • Where the role is assigned to an AD group, it uses the function from this blog post to recursively obtain the group members http://spr.com/azure-arm-group-membership-recursively-part-1/
  • The script reports on whether a user is Co-Administrator, Service Administrator or Account Administrator
  • Report on whether a user is sourced from the Azure AD Tenant or an external directory or if it appears to be an external account
The user running the script must have permissions to read permissions e.g. ‘Microsoft.Authorization/*/read’ permissions
The script can either output the results as an array of custom objects or in CSV format which can then be redirected to a file and manipulated in Excel.
The script could be run as a scheduled task or via Azure Automation if you wanted to periodically run the script in an automated fashion, it can also be extended to alert on certain cases such as when users from outside your Azure AD Tenant have access to a subscription, resource group or individual resource. The latter item is not a default feature of the script as depending on your organisation you may legitimately have external accounts (e.g. if you’re using 3rd parties to assist you with deploying/building or managing Azure).
The script has been published to my GitHub repo. Hopefully it will be of use to others.

HDInsight and WebSSH Security Issue

HDInsight, Microsoft Azure

Background

This post relates to an unpublished ‘feature’ of Microsoft Azure HDInsight Linux clusters that is misconfigured such that it allows users to obtain root access to clusters without having knowledge of the ‘admin’ account name or password via a web console.

I originally raised this with Microsoft Support around the end of October / beginning of November 2016. Initially, support informed me that they had discussed it with the product team and that the security issue that I was reporting was not a security issue because:

  • The security boundary of HDInsight is the Virtual Network (VNET) and
  • The clusters are only intended for single user tenancy (ironically a MSFT Cloud Data Solution Architect recently said to me that HDInsight fully supports multiple users – which I guess is sort of true now with secure clusters being in preview).

Eventually they agreed that it was indeed an issue and disabled the feature on all new clusters as an interim measure.


What is the issue?

An Azure HDInsight Linux cluster consists of head, worker and zookeeper nodes – these nodes are Azure VMs, although the VMs are not visible nor can the individual VMs be managed in the Azure Portal you can SSH to the cluster nodes.

When you provision a cluster you are prompted to set to credentials:

  • One that will be used for the Ambari web interface – which you can login to over HTTPS and a <cluster name>.azurehdinsight.net domain.
  • The other for a local account that will be created on ALL nodes in the cluster which you can then use to SSH to the cluster ssh <user>@<cluster name>-ssh.azurehdinsight.net

The SSH account by default has passwordless sudo – that is you can run sudo su and become root without being prompted for your password.

One of the packages that is installed when you provision a HDInsight cluster is hdinsight-webssh running apt-cache show hdinsight-webssh shows us that it is a Microsoft package (there are other Microsoft HDInsight packages they are all prefixed with hdinsight-):

Running netstat you can see that there is a nodejs based web terminal running and listening on port TCPv6 port 3000:

If you run

you will see the process (which incidentally also runs as root!).

The configuration for the service/application is here:

/etc/websshd/conf.json

It looks like that a number of python scripts are run when you provision a cluster to start ambari, configure hive etc. one of which is to start this websshd service with /opt/startup_scripts/startup_webssh.py

Impact of the issue

The issue cannot be easily exploited by an external attacker e.g. one that does not already have access to infrastructure in the Azure Virtual Network (VNET) that the HDInsight cluster resides in. Such an external attacker would first need to gain access to (doesn’t need to be a privileged account) on any other system hosted in the same VNET and from this point they can easily gain root access on the HDInsight cluster by simply browsing to http://

<clusternodeipaddress>:3000 which would automatically give them a web based shell as the user that has passwordless sudo without entering any username or password.

However, since the default NSG rules allow connectivity within a VNET (as opposed to a default deny that requires all traffic to be explicitly allowed) this makes it easier for an attacker to extend their reach.

Another possibility is that an external attacker would need to find a vulnerability in the proxy servers and/or the various web interfaces that are accessible via the proxies.

In the case of a malicious user who has authorised access to say an application or web server, they would be able to take advantage of the misconfiguration to obtain root access to the HDInsight cluster as described above.

In either case an external attacker or malicious user can then use the root access to exfiltrate data, plant malicious software etc.

Summary

Microsoft have since disabled the service (although the last time I checked back in December 2016 the package is still installed but the service is not running, nor is there a systemd unit file installed.

Microsoft didn’t explain why the package is installed in the first place but I can only assume it was added as a convenience when the product team were developing or testing.

Browser based terminals are problematic when it comes to security but it’s worse when the endpoint is

  1. Unencrypted
  2. Performs no authentication
  3. Drops you in as a user that has passwordless sudo

As an added measure you can disable passwordless sudo for the admin account – which probably shouldn’t be enabled anyway.