Azure Public IP Ranges and Whitelisting

Microsoft Azure, Powershell

Introduction

The default Network Security Group rules in Azure allow any outbound connections to the Internet. For most security conscious organisations this is unacceptable and they must implement default deny rules that override the Microsoft defaults, then only explicitly allow outbound traffic where necessary.

The problem with putting in a default deny is that it breaks various functionality such as the VMAgent being able to report health-status to the Azure platform which is then reflected in the portal, the ability to reset VMs, use custom script or basically any type of VM extension. It can also break other Azure services.

NSGs have convenient tags for the VirtualNetwork, AzureLoadBalancer and Internet – unfortunately there are no built-in tags for various Azure regions or particular Azure services, nor is there a
way to create your own custom tags (e.g. akin to object groups such as those you have with Cisco or Checkpoint firewalls) – so today there is no easy way to do this.

This post discusses using a list of Azure Public IP ranges that Microsoft publishes and using that to whitelist those IP addresses.

Azure Public IP List

Microsoft publishes a list of all the public IP addresses used across the different Azure regions – you can use this to create NSG rules to whitelist those IPs.  You can download this list from here https://www.microsoft.com/en-gb/download/details.aspx?id=41653, the IPs are organised by
 region and provided in XML format. This file covers Azure Compute, Storage and SQL – so it doesn’t cover absolutely all services.

Downloading the file using PowerShell

 The PowerShell code below, retrieves the XML file and saves it locally:
 The function takes two parameters:

  •  The destination path where the file should be saved
  • An optional parameter that specifies the download URL, if not specified it uses a default value

 Return regions in the XML file


  The PowerShell function below returns the regions that the XML file covers by parsing the XML:

Return the IP addresses for a particular region

 The PowerShell function below takes the XML file and a region name, it then depending on the parameters specified:

  • Prints the IP addresses for the specified region to the screen
  • If the OutputAsNSGAllowRuleFormat switch is specified the results are output in the format of NSG rules (as a CSV). This switch requires that the NSGRuleNamePrefix parameter is specified, which is used to prefix the NSG rule names.
  • If the OutputAsIpSecurityXMLFormat switch is used it outputs the IP addresses as IIS IP Security rules XML
  • If the OutputAsCheckpointObjectGroupFormat switch is used it causes the IP addresses to be output in Checkpoint firewall network object group format.

You can then for example use the NSG rule format CSV file and use a PowerShell script to apply the rules – you might want to do this in an automated fashion since some regions have hundreds of IP addresses in this file.

NSG Limits

This brings us to another problem, we can’t create custom tags with NSGs, you can have a maximum of 400 NSGs each containing a maximum of 500 rules per NSG – and you can only have one NSG associated with a Subnet (or NIC). This is problematic because if you’re accessing resources across multiple Azure regions – there is no way you can cover all the IPs and stay within the limits. One option is not to be specific about the ports you allow and just allow ALL traffic to the Azure IPs but you will still reach the limits.

  So what options do we have?

  •  Don’t use NSGs and use a virtual firewall appliance such as a Checkpoint, Barracuda or Cisco appliance.
    • These are not subject to the same limits and support the use of object groups which can simplify the rules.
    • This of course is a costly option because NSG rules are free, where as the appliances will incur a per hour VM cost , plus a software license cost. 
    • Furthermore, you now have to design for high-availability for the appliances and scaling them up to handle more traffic (most of the  options as far as I am aware only support active-passive configuration and do not support load sharing between appliances). 
    • To add to this you also have to manage routes to direct traffic through the appliances – all of which add complexity.
  • Summarise the Azure IPs – while this can be an effective way to stay within the NGS limits, this does mean that you might end up allowing IPs that are outside of the ranges owned by Microsoft and increases your exposure.

 Summarising IP ranges

 If you decide to adopt the approach of summarising the Azure Public IP ranges, you can use the following Python script (which uses the Netaddr module to summarise): https://github.com/vijayjt/AzureScripts/blob/master/azure-ip-ranges/summarise_azure_ips.py

Azure App Service Environments (ASEs) and AD Integration

Microsoft Azure, Powershell

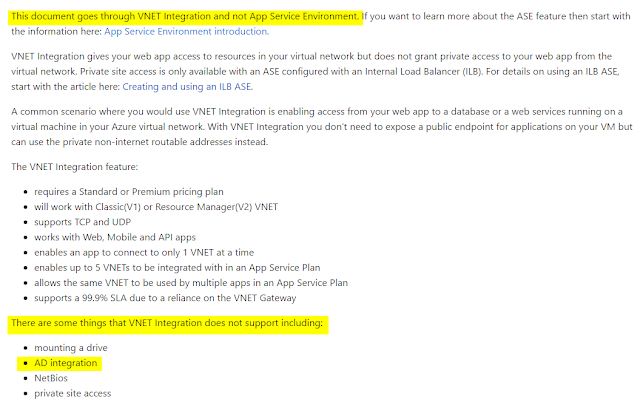
Recently I had to look at a case where there was a requirement to communicate with an Active Directory Domain Controller from a Azure Web App. We were looking to use App Service Environments, looking at the documentation published here https://docs.microsoft.com/en-us/azure/app-service-web/web-sites-integrate-with-vnet,it stated:

This caused some confusion as it appeared to suggest you could not communicate with domain controllers but it appears this is actually more in reference to domain joining.

Furthermore, there is a Microsoft blog post on how to load a LDAP module for PHP with an Azure Web App – which indicates that it is a supported scenario.

You can relatively easily verify this by deploying an Azure Web App with VNET integration or in ASE. I used a modified version of the template published here https://github.com/Azure/azure-quickstart-templates/tree/master/201-web-app-ase-create to create a Web App in an ASE.

I then created a domain controller via PowerShell in this Gist:

Then I used the PowerShell code in this Gist to install AD related roles and promoted the server to a Domain Controller via an answer file – change the forest/domain functional level and other settings to suit your needs.

At this point you can perform a rudimentary test of AD integration via Kudu/SCM PowerShell console.

If you wish to test using PHP, you will need to download the PHP binaries from http://windows.php.net/download/, and extracted them on my computer, in the ext directory you will find the php_ldap.dll file. Note the version you downloads needs to match the version of PHP you have configured your Web App with, which in my case was 5.6.

Next from Kudu / SCM I created a directory named bin under /site/wwwroot, in that directory. Then using FTPS (I used FileZilla, but you will need to create a deployment account first) to upload the php_ldap.dll file.

Then create a file named ldap-test.php with the following php code:

If you then browse to your web app domain and the file e.g. http://mywebapp.azurewebsites.net/ldap-test.php

Auditing Azure RBAC Assignments

Microsoft Azure, Powershell

I recently had a need to create a script to generate a report on Azure RBAC role assignments. The script does a number of things given the domain for your Azure AD tenant:

  • Reports on which users or AD groups have which role;
  • The scope that the role applies to (e.g. subscription, resource group, resource);
  • Where the role is assigned to an AD group, it uses the function from this blog post to recursively obtain the group members http://spr.com/azure-arm-group-membership-recursively-part-1/
  • The script reports on whether a user is Co-Administrator, Service Administrator or Account Administrator
  • Report on whether a user is sourced from the Azure AD Tenant or an external directory or if it appears to be an external account
The user running the script must have permissions to read permissions e.g. ‘Microsoft.Authorization/*/read’ permissions
The script can either output the results as an array of custom objects or in CSV format which can then be redirected to a file and manipulated in Excel.
The script could be run as a scheduled task or via Azure Automation if you wanted to periodically run the script in an automated fashion, it can also be extended to alert on certain cases such as when users from outside your Azure AD Tenant have access to a subscription, resource group or individual resource. The latter item is not a default feature of the script as depending on your organisation you may legitimately have external accounts (e.g. if you’re using 3rd parties to assist you with deploying/building or managing Azure).
The script has been published to my GitHub repo. Hopefully it will be of use to others.

HDInsight Cluster Scaling

Microsoft Azure, Powershell

I recently had to come up with options for scaling a Azure HDInsight cluster out (adding worker nodes) or in (removing worker nodes) based on a time based schedule.    At the time of writing HDInsight doesn’t allow you to pause or stop a cluster – you have to delete the cluster if you do not want to incur costs. One way of potentially reducing costs is to use workload specific clusters with Azure Blob Storage and Azure SQL Database for the metastore, then scaling down the cluster outside of core hours when there is no processing to be done.

There are a number of ways of doing this including:

  • Using Azure Resource Manager (ARM) template that has a parameter for the number of worker nodes; then simply running the template at a scheduled time with the    appropriate number of worker nodes.
  • Using the PowerShell module to scale the cluster with Set-AzureHDInsightCluster cmdlet and either running the script as a scheduled task from a VM or using Azure Automation

This post is going to show how to use a script that can be run either via Azure Automation or via a scheduled task running on a VM, the solution consists of:

  • An Azure Storage Account containing XML configuration files that includes information on the cluster, the subscription within which it resides, the number of     worker nodes when scaling out the cluster, the number of worker nodes when scaling in the cluster, a list of email addresses of people that are to be notified when a   scaling operation takes place
  • A PowerShell script that uses the Azure PowerShell module to scale the cluster out and send email notifications
  • Optionally an Azure Automation account from which to schedule the script to run

Azure Storage

Create a storage account (a LRS storage account is sufficient) and a private container, in the container for each cluster store a XML configuration file of the following format:

 <ClusterConfiguration>

     <SubscriptionName>MySubscriptionName</SubscriptionName>

     <ResourceGroupName>MY-RG-0001</ResourceGroupName>

     <ClusterName>vjt-hdi1</ClusterName>

     <MinWorkers>1</MinWorkers>

     <MaxWorkers>3</MaxWorkers>

 </ClusterConfiguration>

Where:

  • <SubscriptionName> is the subscription containing the cluster to be scaled out/in
  • <ResourceGroupName> is the resource group containing the HDInsight cluster to scale
  • <ClusterName> is the name of the cluster to scale
  • <MinWorkers> is the number of worker nodes in the cluster when performing a scale IN operation
  • <MaxWorkers> is the number of worker nodes in the cluster when performing a scale OUT operation
  • <Notify> is a comma separated list of email addresses to which notifications are to be sent

NOTE: It is important that the XML configuration file is in UTF-8 format.

While one XML configuration file could conceivably contain the information for every cluster there are a number of benefits to having one configuration file per cluster:

  • No need to write logic to parse the file and find the relevant part for the target cluster
  • I can keep each cluster configuration in version control and separately modify them
  • A mistake in the file is less likely to affect all clusters

PowerShell script

The HDInsight cluster scaling PowerShell script is available in my GitHub repository.

The script will need to be modified to suit your environment but the key elements of the script are described here. Since the script can be either run from Azure Automation or via a scheduled task from a Windows server, it supports sending emails from an internal mail server. The script assumes no authentication is required for the internal mail server (but it is trivial to add authentication support for the internal mail server).

Email Providers

The script supports sending emails via SendGrid, Office365 or via internal / on-premise mail servers. At present the latter is supported via hard-coded mail server details but these could be   provided via a XML configuration file or parameters to the script.

Storing credentials on disk

There are other ways of doing this but when the script runs via a scheduled task from a VM it expects that the credentials for the SendGrid / Office365 email account to be stored in encrypted from on disk in an XML file. This is achieved using the Windows Data Protection API.
     1. First open a PowerShell console *as the user under which the scheduled task will run*. E.g.
         runas /user:SVC-RTE-PSAutomation powershell.exe
     2. Then read the password in
         $Password = Read-Host -assecurestring "Please enter your password"
         $Password | ConvertFrom-SecureString
     3. Paste it into the password tag of the XML file
      <credentials>
         <credential>
             <password>ReplaceWithActualPassword</password>
         </credential>
      </credentials>

Key Elements of the script

Since the script can be executed via Azure Automation or via a scheduled task, if the $PSPrivateMetadata.JobId property exists then the script is running in Azure Automation. following snippet checks whether the job is running in Azure Automation:
If( -not($PSPrivateMetadata.JobId) )
Next the script contains two try catch blocks one that authenticates using the “Classic” Azure PowerShell module, and the other with the ARM based Azure PowerShell module.
The Get-ClusterScalingConfigurationFile function uses the classic Azure PowerShell module cmdlets to retrieve the storage account key and creates an Azure Storage Account context which is then used to download the blob/file from the storage accoun uses the classic Azure PowerShell module cmdlets to retrieve the storage account key and creates an Azure Storage Account context   which is then used to download the blob/file from the storage account. Note it is important the the cluster configuration file is in UTF-8 format else when we try to parse the contents of the file as XML it will fail (especially if it’s UTF-8 WITH BOM).
 [byte[]] $myByteArray = New-Object -TypeName byte[] -ArgumentList ($BlobReference.Length)
 $null = $BlobReference.ICloudBlob.DownloadToByteArray($myByteArray,0)
 [xml] $BlobContent = [xml] ([System.Text.Encoding]::UTF8.GetString($myByteArray))
The Get-HDInsightQuota function uses the Get-AzureRmHDInsightProperties cmdlet to obtain the number of cores used and available for HDInsight, the script then uses information when scaling out the cluster.
First we use the Get-AzureRmHDInsightCluster cmdlet to get the cluster’s Azure Resource ID, then pass this to the Get-AzureRmResource cmdlet to then obtain the VM sizes currently in use by the cluster – this information is not provided by the Get-AzureRmHDInsightCluster.
 $HDInsightClusterDetails = Get-AzureRmHDInsightCluster | Where-Object {
    $_.Name -eq $ClusterName
  }
  $ClusterSpec = Get-AzureRmResource -ResourceId $HDInsightClusterDetails.Id |
  Select-Object -ExpandProperty Properties |
  Select-Object -ExpandProperty computeProfile

Programmatically authenticate against Apache CXF Fediz with ADFS Token

Powershell, Windows

A couple of weeks ago we had to interface with an application running on Tomcat using Apache CXF Fediz as it’s authentication mechanism. We had successfully tied the application to work with our ADFS 3.0 server using SAML 1 tokens. While this worked wonderfully for users using web browsers we had problems getting it to work programmatically with Powershell. This was needed for some API calls and we had to authenticate with ADFS first.

So below you will find the script we used along with it’s description, I have actually posted two scripts one where you obtain an initial cookie from the application as this was a requirements and a second one where an initial coockie is not neeed. If you get the message “HTTP Status 408 – The time allowed for the login process has been exceeded. If you wish to continue you must either click back twice and re-click the link you requested or close and re-open your browser” then you need to use the cookie method.

So how does the script work:

  • First it obtains the needed cookie from the Apache application and stores it in a web session
  • Then it creates the envelope for the soap call to the ADFS server, we are requesting an “urn:oasis:names:tc:SAML:1.0:assertion” but you can request an “urn:oasis:names:tc:SAML:2.0:assertion” if need be.
  • It then makes a post request to the ADFS server with the envelope in the body
  • Once it receive the reply we need to clean it as we only require the body section example of the result:
  • The script then loads the result into a hashtable
  • It then makes a post request with the hashtable in the body to the Apache application using the Websession we initially established
  • Once that is complete we can use the web session to make any api calls we like eg(getting a status)


For application requiring an initial cookie:

For application not requiring to obtain an initial cookie:


Adding multiple UPN/SPN Suffixes via Powershell

Powershell

If you ever have the need to add multiple UPN or SPN suffixes to your forest here is a simple script which will do it in no time. Just add the suffixes to a text file, one per line works the best :).


For UPN Suffixes

For SPN Suffixes


Adding multiple values to Gateway Managed Computer Groups Powershell

Powershell

If you ever had to add multiple values to the Gateway Managed Computer Groups there is really only one way of doing it quickly and easily and that’s via powershell. The script below enters an existing group and then loops in order to add all the ip addresses from a /24 CIDR. Since you can’t add subnets or ip ranges you have to add every single address which in this case is 255 addresses, without powershell this will be a nightmare.

Powershell check if ip or subnet belong to each other

Powershell

I needed a powershell script today with which i can check if two given IP addresses match or if a given IP address belongs to a subnet or if a smaller subnet belongs to a larger one (or vise vursa). I found a nice script written by Sava from http://www.padisetty.com/ which had part of the functionality i required so i took and modified it to suit my needs. Below you will be able to find the modified script i hope it helps somebody :). The script will return an array of two values, one to indicate true or false and the second the direction.  The direction is important as you may want to compare values for a firewall and as such you want to fit one in the other in a particular direction.

Usage example:

  • checkSubnet ‘10.185.255.128/26’ ‘10.165.255.166/32’
  • checkSubnet ‘10.125.255.128’ ‘10.125.255.166′
  • checkSubnet ‘10.140.20.0/21’ ‘10.140.20.0/27’


Control VMware ESXI (free hypervisor) with Powershell and SSH

Powershell, VMware

Some time ago i wanted to to run some build scripts in my home lab which needed to power off and on a virtual machine running Independent Non-Persistent disks in order for the VM to be in a clean state before each build. However i was running the free hypervisor version of ESXI so the api was not available, then i figured that i could do this via SSH and Powershell. In order for the example script below to work you will need to do a couple of things to the esxi server and the machine executing the script.


You will first need to make sure you have the powershell ssh module copied to the following locations on the machine executing the script:

C:\Windows\SysWOW64\WindowsPowerShell\v1.0\Modules

C:\Windows\System32\WindowsPowerShell\v1.0\Modules

You can download the file from here: SSH-Sessions

*Note i am not the creator of the SSH-Module and the original is located at http://www.powershelladmin.com


Then you will need to generate a public/private key for the SSH user you are going to use and load the public key into ESXI. VMware has made a nice set of instruction on how to do it here.
Keep the private key as you will need it when running the script. You will also need to enable SSH and allow it thru the firewall on the ESXI server.


The below script is an example of what you can do with powershell and ssh on an ESXI server. The script will look for a vm on a specific ESXI server you have specified, it will then check if it’s powered on, if so it will power it off, then it will power it on and wait for VMware tools to be up before finishing: