Azure NSG Ports/Rules for Hindsight outbound

Microsoft Azure

A few weeks ago we had a requirement to restrict the outbounds ports of HDinsight for security reasons, so this article is dedicated to that requirement. Before we begin Microsoft official position on this is:

Important: HDInsight doesn’t support restricting outbound traffic, only inbound traffic. When defining Network Security Group rules for the subnet that contains HDInsight, only use inbound rules.

So after reading the above (from: https://azure.microsoft.com/en-gb/documentation/articles/hdinsight-extend-hadoop-virtual-network/) we took it as a challenge to get this working, after much testing we managed to get all the required ports. We have tried by deploying multiple clusters and so far it all works and deploys correctly, a couple of notes:

  • The solution below is not 100% secure but it mitigates the risk by lowering the “attack” service to only the regional azure IPs.
  • We also needed to open port 80 to the Ubuntu website (91.189.88.0/21) as this is required by some of the Apache tests after deployment
  • While testing we noticed that the servers communicate with the management point over a random port, this port seemed to be in the same range as the dynamic Azure SQL ports of 11000-11999 and 14000-14999. However to be on the safe side we opened a larger range 10000-49151 as we can’t be 100% sure.
  • You will need to open multiple rules for each Azure Regional IP (i suggest you combine the ips to the second octed). The ip addresses can be found here: https://www.microsoft.com/en-gb/download/details.aspx?id=41653. You will also need to keep the ip addresses updated (A new xml file will be uploaded every Wednesday (Pacific Time) with the new planned IP address ranges. New IP address ranges will be effective on the following Monday (Pacific Time)).
  • This is all unofficial and while we have had no problems with multiple deployments i can’t give any guarantees.

Inbound Ports

Name Priority Action Source Source Port Destination Destination Port Protocol Direction Description
Allow-HDinsight01-Inbound 1001 Allow 168.61.49.99/32 * Subnet Range 443 * Inbound Required for Hdinsight Healthchecks
Allow-HDinsight02-Inbound 1002 Allow 23.99.5.239/32 * Subnet Range 443 * Inbound Required for Hdinsight Healthchecks
Allow-HDinsight03-Inbound 1003 Allow 168.61.48.131/32 * Subnet Range 443 * Inbound Required for Hdinsight Healthchecks
Allow-HDinsight04-Inbound 1004 Allow 138.91.141.162/32 * Subnet Range 443 * Inbound Required for Hdinsight Healthchecks

Outbound Ports

Name Priority Action Source Source Port Destination Destination Port Protocol Direction Description
Allow-HDInsightToUbuntu-Outbound 2001 Allow Subnet Range * 91.189.88.0/21 80 TCP Outbound Required for Hdinsight
Allow-HDinsight01-Outbound 2002 Allow Subnet Range * Azure Regional Range 80 TCP Outbound Required for Hdinsight
Allow-HDinsight02-Outbound 2003 Allow Subnet Range * Azure Regional Range 443 TCP Outbound Required for Hdinsight
Allow-HDinsight03-Outbound 2004 Allow Subnet Range * Azure Regional Range 1433 TCP Outbound Required for Hdinsight
Allow-HDinsight04-Outbound 2005 Allow Subnet Range * Azure Regional Range 10000-49151 TCP Outbound Required for Hdinsight

ADFS Claim Rules for Groups and Cross Forest

Windows

Here are some quick ADFS claim rules to get some specific requests. Remember to create the rules in order:

Case 1

Get the users group membership, including groups of groups and filter on for any group beginning with “Group-XX” then send as a role claim:

Rule 1

Rule 2


Case 2 (Update 13/09/2016 – Apologizes as i had uploaded the wrong rules initially, they are now correct)

Get the users Cross Forest Sec Group Membership (from TESTDOMAIN domain) Claim including groups of groups and filter on for any group beginning with “Group-XX” then send as a role claim.Before you set these rules remember to give the ADFS service account access to read foreign group membership of the domain you are quering as detailed here: https://social.technet.microsoft.com/Forums/windowsserver/en-US/bda33eb9-ff6e-4e79-967d-f5430ade7310/give-access-to-account-to-view-member-of-attribute-on-foreign-security-principal?forum=winserverDS

  • Replace TESTDOMAIN with the domain you are trying to query
  • Replace Group-XX with the beginning of the group/s you are looking for, it’s a regex expression and you can also customize it to your needs. Alternatively you can remove “,  Value =~ “(?i)^Group-XX” ” and that will list all groups.

Rule 1

Rule 2:

Rule 3:

Rule 4:

Rule 5:


Turn off ProtectedFromAccidentalDeletion From OU and All sub OUs

Windows

If you ever had the task to delete an OU which had Protected From Accidental Deletion enabled on all sub OU’s it can be a pain to manually unchecked for every single one.The easy fix is to run a command to turn off the feature for you on all sub OU’s. To do this we run the following powershell command, just replace the path to your OU and the server, leave the rest as it is:


Update Azure Automation PS Modules at once

Microsoft Azure

Update 19/02/2017

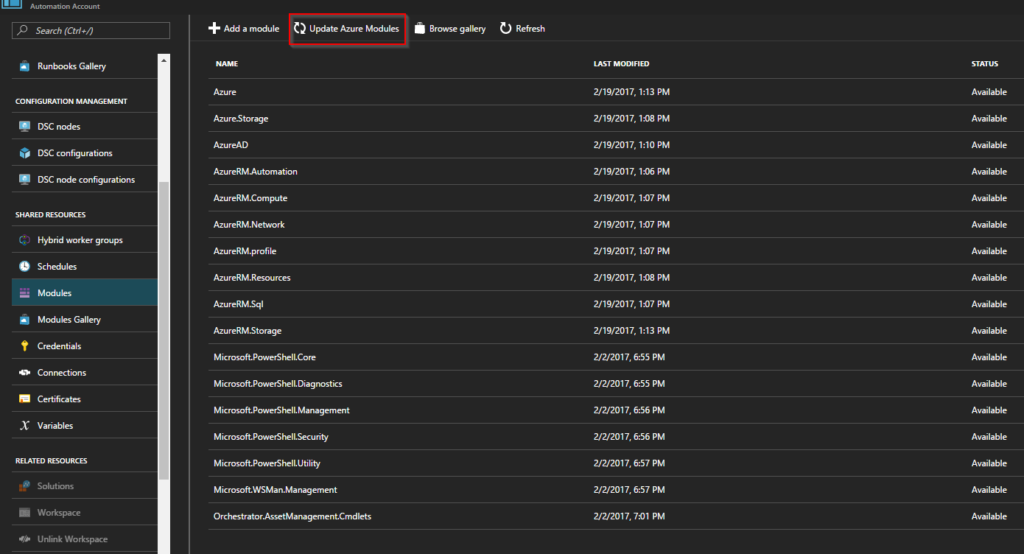
Microsoft has now introduced a new button which updates all modules for you, very easy as shown on the screenshot:


-== Outdated ==-

Now if any of you use Azure Automation you know that updating the Powershell Modules is a pain as they require dependency to be installed first.This can easily take you a whole day to do by hand. However there is a very easy way to this.

The way to update them all including dependency is to run the json template for the AzureRM module. You can find the deploy to azure button and the lates version here: https://www.powershellgallery.com/packages/AzureRM/. All you need to do is chose the subscription, resource and your automation account.

Please note that the file currently does not include all regions and as such you may need to do it manually as described below:

You may need to modify it as the file does not include all regions where automation is available and will fail. You can use the code below to replace the json Automation Account Location section before you run the template:


Configure GitLab SAML with ADFS 3.0

Windows

While setting up gitlab with ADFS 3.0 we noticed there is a couple of gotchas you need to watch out for:

  1. You need to set the NotBeforeSkew to something like 2 in ADFS
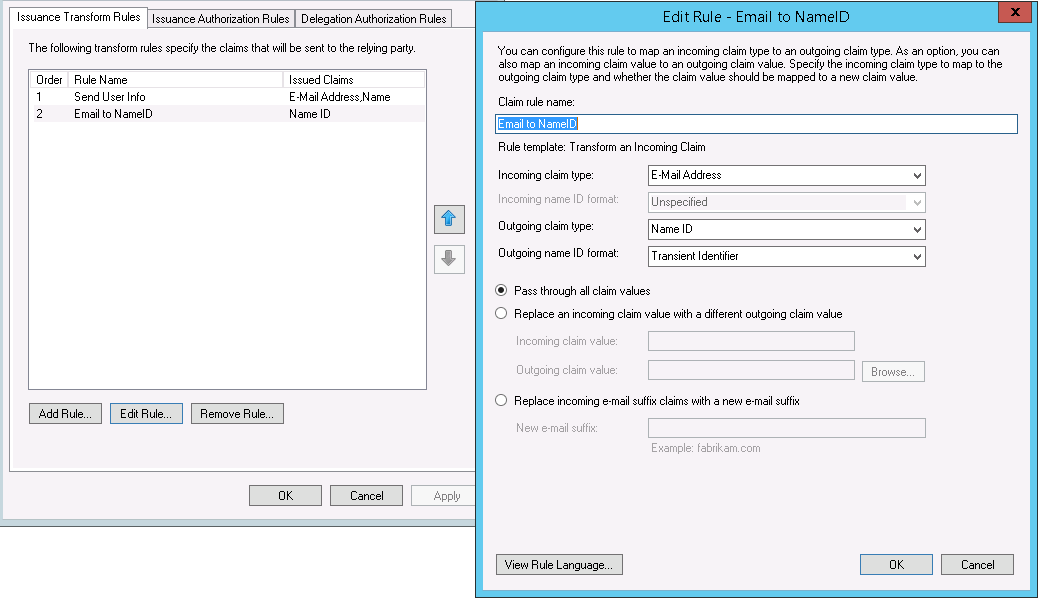
  2. You need to trasform the transient identifier in ADFS
  3. idp_cert_fingerprint is case sensitive and needs to be all in CAPS

To set it up follow the following instructions:

In gitlab you need to set the following config

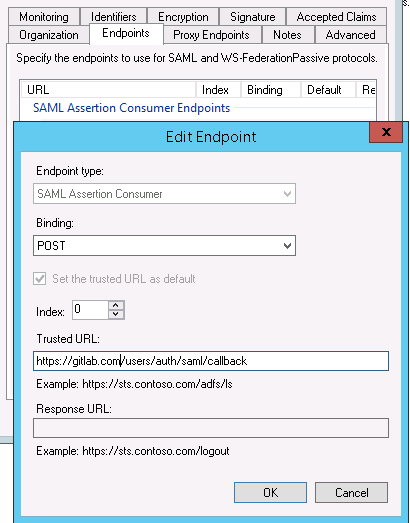
  • Replace the https://gitlab.com with your gitlab address
  • Replace the https://adfs.com with your ADFS address
  • REplace the https://gitlab.local with what ever you like
  • Replace 35:FA:DD:CF:1E:8F:8B:E4:CA:E1:AE:2A:EF:70:95:D5:DC:5C:67:1B with the finger print of your signing certificate


For ADFS configure the following settings (Use the same address replacements as above):

gitlab1

gitlab2

gitlab3

gitlab4gitlab5 gitlab6

Then Run the following command to set the skew in Powershell on the ADFS server: