New-Object PSObject Problem with Azure Automation

Microsoft Azure

I found a weird behaviour in Azure automation, if you use “New-Object PSObject” it runs perfectly fine when the script is executed directly (via the portal or the Powershell command “Start-AzureRmAutomationRunbook”). However if you try and do an inline call from another workbook it fails and errors out with something like:

the code i used initially was (snippet):

It seems like this command is no longer supported or runs correctly when the child workbook is called by another workbook. To get around this i recommend using the Powershell v3 method which works perfectly:


Azure Public and Internal Load balancer for the same availability set

Microsoft Azure

This is one people keep asking me which Microsoft hasn’t published officially. Currently Microsoft Azure allows you to have a public and private load balancer in front of the same availability set.

You can also link both load balancer to the same machines in the availability set. This will enable your servers to have a load balanced private and public IP, which comes in real handy.

You can also link the public to some of the machines and the private to other machines in the availability set.


Web Application Proxy Event ID 12019 – (0x8007007b)

Windows

For anyone that has received the below WAP error, especially in Server 2016, please make sure that the published application name does not have any forward slashes “/”.

It seems to like other characters like: “wqe.()-_\sdfds123″££$%%” but not forward slashes.


OMS and Power BI Integration Schedule

Microsoft Azure

This is more of a gotcha than anything else but when you’re setting up a schedule to export OMS queries/logs to Power BI please be aware that the initial schedule you setup will also be the historical data it retrieves. What I mean by that is, if I setup a schedule for 24 hours (which is currently the max) in its initial sync it will export the data from that point back 24 hours. So don’t be surprised if you only have the last x amount of data, once the schedule is running it will keep exporting every x hours or minute whatever you have setup so your data over time will grow beyond the schedule you initially setup.

This does raise some concerns and questions:

  • What happens if the sync fails, most likely you will lose some data and it will not be consistent
  • How do I export all the data and sync I? For the moment you can export it to CSV and then import it in PowerBI.
  • You could cheat and set a schedule for 24 hours let it sync and then change it to an hour, this will at least get you the 24 hours rather than just an hour of historical data
  • Is this going to change as this feature is still in preview?

Intune Remote Wipe for Mac OS X

Microsoft Azure

As i couldn’t find this information anywhere online and had to get confirmation from Microsoft i am posting it here. As of writing this article and most likely for at least the next 3 months Microsoft Intune does not support Remote wipe, both Full and Selective for OSX (macOS). So take this into account when plaing your deployments.

Intune does however support Windows, Android and the ISO as described here https://docs.microsoft.com/en-gb/intune/deploy-use/use-remote-wipe-to-help-protect-data-using-microsoft-intune

Microsoft Dynamics NAV 2015 Wildcard Certificate Problem

Windows

I had a problem the other day trying to get Dynamics NAV 2015 to work with a wildcard certificate.While the server started ok, clients couldn’t connect and the error message at the end of this post appeared. The problem seem that you need to define the DnsIdentity on all clients, seems like the client application can’t recognize wildcard dns names automatically and you need to define it yourself. The down side of this is that all clients need to make this modification, while using normal certificates connect clients automatically. So if you do decide to go down this route be aware of this. The fixes are defined below.

To fix it on the client side:

modify the “C:\Users\username\AppData\Roaming\Microsoft\Microsoft Dynamics NAV\80\ClientUserSettings.config” to include the proper certificate name for DnsIdentity :

To fix it on the Nav Server Web Instance:

you can modify the web.config of your Nav web instance for example “C:\inetpub\wwwroot\Mynav” to include the proper certificate name for DnsIdentity :

You can also run the powershell command from Navs powershell:


The error on the Nav Web Instance or Client:

How To Install Oracle Instant Client v12 For Xampp v7, v5.5 & v5.6 (Windows)

Windows

Below you will find the instructions on how to configure/install and enable the Oracle Instant Client for XAMPP v7, v5.5 and v5.6.

  1. Download and install XAMPP from https://www.apachefriends.org/download.html
  2. Modify the php.ini in “C:\xampp\php”
    • Uncomment the following line “;extension=php_oci8_12c.dll  ; Use with Oracle Database 12c Instant Client”
    • Restart Apache
  3. Download the 32 bit (PHP is 32 bit so no need to 64) Oracle Instant Client from http://www.oracle.com/technetwork/topics/winsoft-085727.html
    • You need both Instant Client Package – Basic and Instant Client Package – SDK
    • Unzip both in “C:\php-sdk\oracle\x86\instantclient_12_1″ and “c:\php-sdk\oracle\x86\instantclient_12_1\sdk” respectivly
  4. Add the directory “C:\php-sdk\oracle\x86\instantclient_12_1″ to the windows path veritable
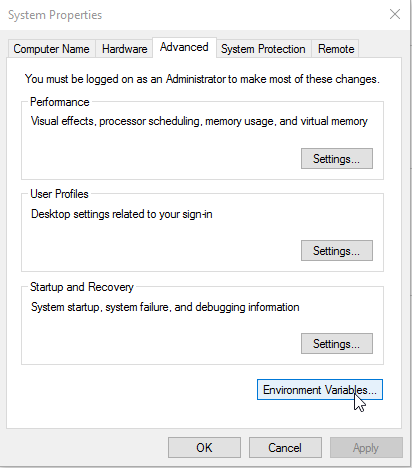
    • Under system Properties click Environment Variables
    • system-properties
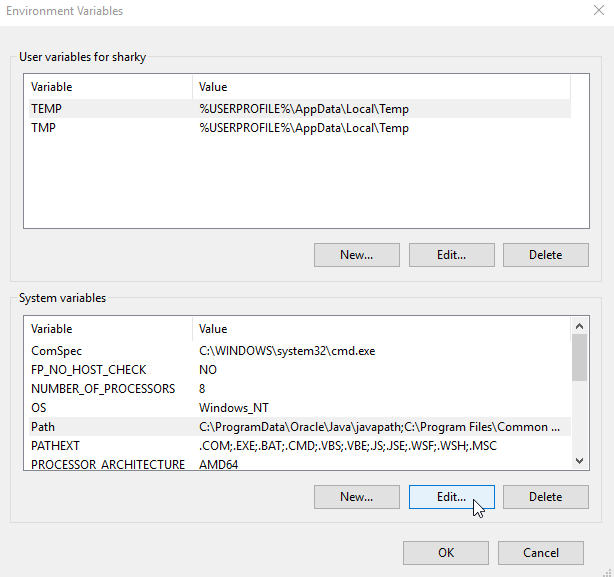
    • Edit the Path variable
    • environment-variables
    • You need to reboot windows
  5. (Optional)If you want to specify the oracle connections in the tnsnames.ora file:

Thats it 🙂


ADFS 3.0 Cancel Button Redirection and Password Change Link

Windows

ADFS 3.0 Cancel Button Redirection

I got asked the other day if i can get the ADFS cancel button on the Update Password page (Expired Password) to redirect back to the original page. After some searching i found a lot of people asking for this feature but no solutions. So below is my own coded solution to solve this problem all you need to do is add it to the end of onload.js, instruction are below the code.

The code will work with:

  • All java enabled browsers
  • Will work with any domain
  • Will work with expired password redirection
  • Will work with all endpoints
    • /adfs/ls/idpinitiatedsignon.aspx
    • /adfs/oauth2/authorize
    • /adfs/ls/

Use the following steps when customizing the onload.js for the AD FS service (Note these steps are taken from: https://technet.microsoft.com/en-us/library/dn636121.aspx).

Customizing onload.js for the AD FS Service

  1. To add your custom logic to onload.js, you need to first create a custom web theme. The theme that is shipped out-of-the-box is called Default. You can export the default theme and use it so that you can start quickly. The following cmdlet creates a custom web theme, which duplicates the default web theme:

  2. You can then export the custom or default web theme to get onload.js file. To export a web theme, use the following cmdlet:

    You will find onload.js under the script folder in the directory that you specify in the export cmdlet above and add your custom logic to the script (see use cases in the Example section below).

  3. Make the necessary modification to customize onload.js based on your need.

  4. Update the theme with the modified onload.js. Use the following cmdlet to apply the update onload.js to custom web theme:

  5. To apply the custom web theme to AD FS, use the following cmdlet:

Password Change Link

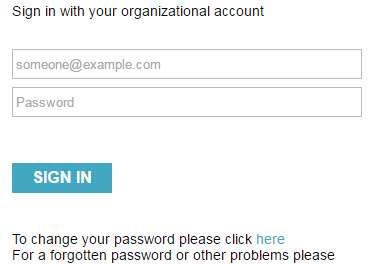
So with the above implementation (which works great for expired passwords) we also needed to modify our password change link for any users wanting to change there password via ADFS before it has expired as show in the below screen shot:

adfs-password-change-link-screen

The below code will give you exactly that ability, implementation instruction are located below. You only need to modify the text in the <p> </p> tags to whatever suits your needs. Please leave the link section “<a onclick=”RedirecToPSChange()” href=”#”>” as is or the script will not work.

The above code can be loaded easily by running the Set-ADFSGlobalWebContent and passing the whole code. Tip you single quotes as shown below:

adfs-password-change-link

ADFS 3.0 default login domain

Windows

The below script is a modification of the Microsoft script found here: https://technet.microsoft.com/en-us/library/dn636121(v=ws.11).aspx. I have added some extra feature missing from the original as well as the ability for default login domain to work in the change password dialog as well. The script below will give you the following benefits:

  • The ability to set a default domain for ADFS both on the login page and in the change password page.
  • Other users can still specify a domain or a UPN in which case the script will not append the domain to the front
  • Works on any Java enabled browser

You only need to change the “MYDOMAIN” in the two places below and that’s it the script is ready. Then just add it to the end of onload.js, you can use the instructional on https://technet.microsoft.com/en-us/library/dn636121(v=ws.11).aspx for instructions on how to load it.


Programmatically authenticate against Apache CXF Fediz with ADFS Token

Powershell, Windows

A couple of weeks ago we had to interface with an application running on Tomcat using Apache CXF Fediz as it’s authentication mechanism. We had successfully tied the application to work with our ADFS 3.0 server using SAML 1 tokens. While this worked wonderfully for users using web browsers we had problems getting it to work programmatically with Powershell. This was needed for some API calls and we had to authenticate with ADFS first.

So below you will find the script we used along with it’s description, I have actually posted two scripts one where you obtain an initial cookie from the application as this was a requirements and a second one where an initial coockie is not neeed. If you get the message “HTTP Status 408 – The time allowed for the login process has been exceeded. If you wish to continue you must either click back twice and re-click the link you requested or close and re-open your browser” then you need to use the cookie method.

So how does the script work:

  • First it obtains the needed cookie from the Apache application and stores it in a web session
  • Then it creates the envelope for the soap call to the ADFS server, we are requesting an “urn:oasis:names:tc:SAML:1.0:assertion” but you can request an “urn:oasis:names:tc:SAML:2.0:assertion” if need be.
  • It then makes a post request to the ADFS server with the envelope in the body
  • Once it receive the reply we need to clean it as we only require the body section example of the result:
  • The script then loads the result into a hashtable
  • It then makes a post request with the hashtable in the body to the Apache application using the Websession we initially established
  • Once that is complete we can use the web session to make any api calls we like eg(getting a status)


For application requiring an initial cookie:

For application not requiring to obtain an initial cookie: