Cooler Master Aquagate Max – Pump Replacement

Cooling

For those of you lucky enough to have brought a water-cooling kit back in the day (2008 :D) when there where just a few choices and prices where very high you probably heard of Cooler Master Aquagate Max. Or if you where lucky enough you actually got one of these bad boys:

cooler_master1

Well after 8 years of continues operation cooling a Q9550 + GTX 260 and later on an i7 4790K + GTX 970 the water pump has finally given up and called it quits. I have to say i was very impressed with this product and regard it as one of the best pc purchases i have ever made. Lets face it 8 years of operation and being probably the only part i haven’t upgraded over the years it has stood the test of time and it’s a real shame it’s was discontinued. I never imagined it would last this long and by now i expected it to either leak and destroy my pc or brake.

So i had two options either buy a new kit or replace the pump, i decided to go with option two (because i am sentimental). In this article i will go over what you need while the chances of this article actually helping someone are very remote some might find it interesting.
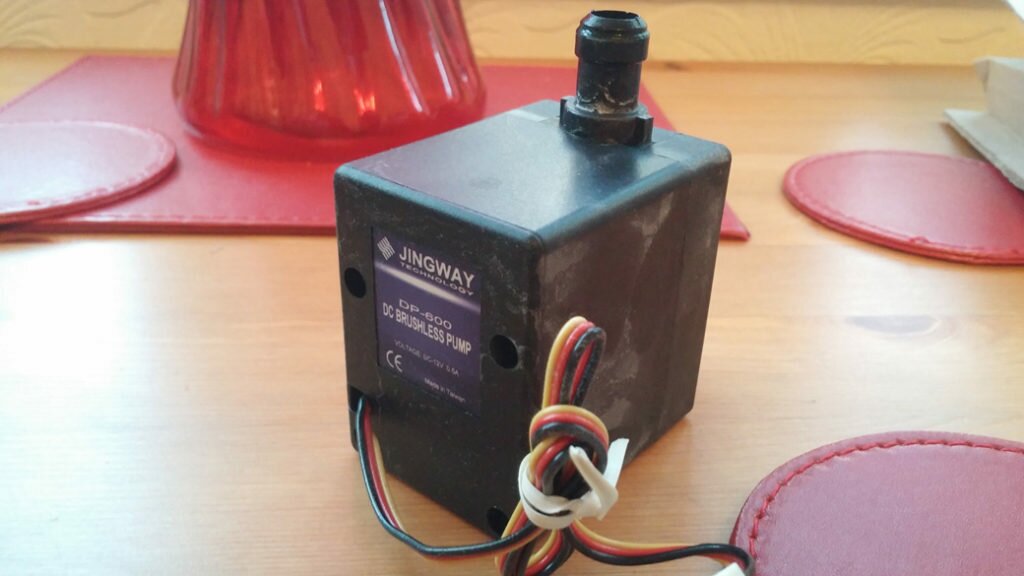
jingway-dp-600So obviously the best option is to buy a direct replacement, the original kit is powered by a S-Type Jingway DP-600 which delivers 520L/H which is very quiet and long lasting :D. The good news is the company still operates http://www.jingway.com.tw/en/products.html and you can buy the pump, now me being me i couldn’t wait for the shipping from china given my computer was out of action and decided to do this the hard way and get a different pump.


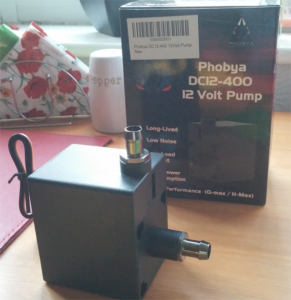
phobya-dc12-400


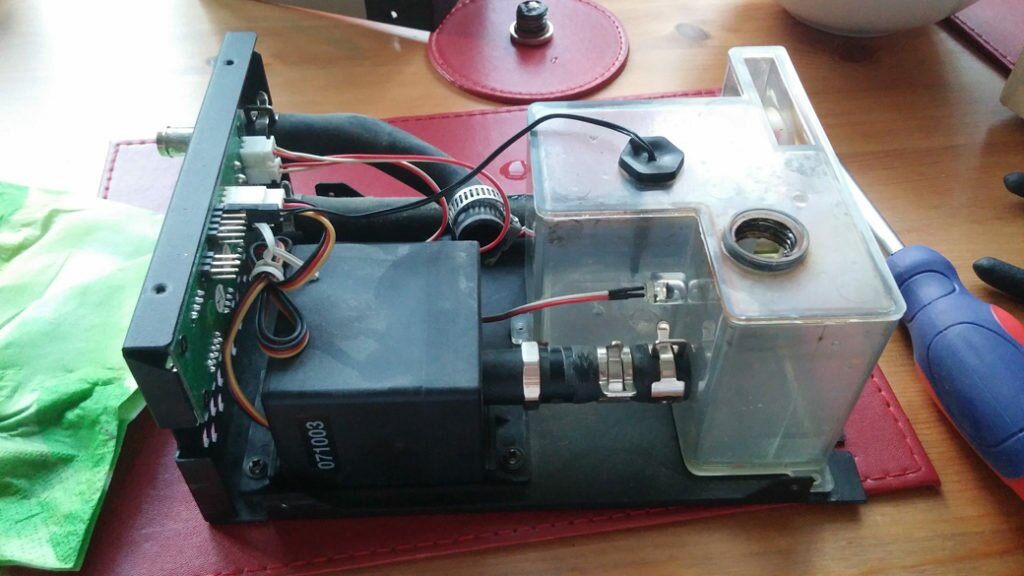
After some searching i found out that the Phobya series are the best replacement and there is a good reason for this, it seems it’s either a sister company or they have brought the designs from jingway. Now if you want a perfect fit go for the Phobya DC12-220 (400 l/h), which will fit nicely in the gap i however decided to go for the more powerful model the Phobya DC12-400 (800 l/h). One note to make is that i am not entirely happy with the Phobya DC12-400, it does cause a few vibrations and being in the metal case produces a lot of noise at 100% power, so much so that i decided to plug it into the mother board and run it only at 50%. At this speed you can’t hear the pump at all and still keeps the temperature quite low. One very important note you will also need to purchase two G1/2″ to 3/8″ Barb Fitting, do not make the mistake of getting G1/4, while the tubing on the outside is 1/4 the tubes used inside the box are actually 1/2. Don’t worry if you make that mistake as i did 😀 you can stretch a 1/4 tube and get it to fit as show later in the photos, i was lucky enough to have one spare G1/2″ to 3/8″ Barb Fitting so only need to stretch one tube the clear one.

Before:

cooler-master2

After:

cooler-master3


Azure NSG Ports/Rules for Hindsight outbound

Microsoft Azure

A few weeks ago we had a requirement to restrict the outbounds ports of HDinsight for security reasons, so this article is dedicated to that requirement. Before we begin Microsoft official position on this is:

Important: HDInsight doesn’t support restricting outbound traffic, only inbound traffic. When defining Network Security Group rules for the subnet that contains HDInsight, only use inbound rules.

So after reading the above (from: https://azure.microsoft.com/en-gb/documentation/articles/hdinsight-extend-hadoop-virtual-network/) we took it as a challenge to get this working, after much testing we managed to get all the required ports. We have tried by deploying multiple clusters and so far it all works and deploys correctly, a couple of notes:

  • The solution below is not 100% secure but it mitigates the risk by lowering the “attack” service to only the regional azure IPs.
  • We also needed to open port 80 to the Ubuntu website (91.189.88.0/21) as this is required by some of the Apache tests after deployment
  • While testing we noticed that the servers communicate with the management point over a random port, this port seemed to be in the same range as the dynamic Azure SQL ports of 11000-11999 and 14000-14999. However to be on the safe side we opened a larger range 10000-49151 as we can’t be 100% sure.
  • You will need to open multiple rules for each Azure Regional IP (i suggest you combine the ips to the second octed). The ip addresses can be found here: https://www.microsoft.com/en-gb/download/details.aspx?id=41653. You will also need to keep the ip addresses updated (A new xml file will be uploaded every Wednesday (Pacific Time) with the new planned IP address ranges. New IP address ranges will be effective on the following Monday (Pacific Time)).
  • This is all unofficial and while we have had no problems with multiple deployments i can’t give any guarantees.

Inbound Ports

Name Priority Action Source Source Port Destination Destination Port Protocol Direction Description
Allow-HDinsight01-Inbound 1001 Allow 168.61.49.99/32 * Subnet Range 443 * Inbound Required for Hdinsight Healthchecks
Allow-HDinsight02-Inbound 1002 Allow 23.99.5.239/32 * Subnet Range 443 * Inbound Required for Hdinsight Healthchecks
Allow-HDinsight03-Inbound 1003 Allow 168.61.48.131/32 * Subnet Range 443 * Inbound Required for Hdinsight Healthchecks
Allow-HDinsight04-Inbound 1004 Allow 138.91.141.162/32 * Subnet Range 443 * Inbound Required for Hdinsight Healthchecks

Outbound Ports

Name Priority Action Source Source Port Destination Destination Port Protocol Direction Description
Allow-HDInsightToUbuntu-Outbound 2001 Allow Subnet Range * 91.189.88.0/21 80 TCP Outbound Required for Hdinsight
Allow-HDinsight01-Outbound 2002 Allow Subnet Range * Azure Regional Range 80 TCP Outbound Required for Hdinsight
Allow-HDinsight02-Outbound 2003 Allow Subnet Range * Azure Regional Range 443 TCP Outbound Required for Hdinsight
Allow-HDinsight03-Outbound 2004 Allow Subnet Range * Azure Regional Range 1433 TCP Outbound Required for Hdinsight
Allow-HDinsight04-Outbound 2005 Allow Subnet Range * Azure Regional Range 10000-49151 TCP Outbound Required for Hdinsight

ADFS Claim Rules for Groups and Cross Forest

Windows

Here are some quick ADFS claim rules to get some specific requests. Remember to create the rules in order:

Case 1

Get the users group membership, including groups of groups and filter on for any group beginning with “Group-XX” then send as a role claim:

Rule 1

Rule 2


Case 2 (Update 13/09/2016 – Apologizes as i had uploaded the wrong rules initially, they are now correct)

Get the users Cross Forest Sec Group Membership (from TESTDOMAIN domain) Claim including groups of groups and filter on for any group beginning with “Group-XX” then send as a role claim.Before you set these rules remember to give the ADFS service account access to read foreign group membership of the domain you are quering as detailed here: https://social.technet.microsoft.com/Forums/windowsserver/en-US/bda33eb9-ff6e-4e79-967d-f5430ade7310/give-access-to-account-to-view-member-of-attribute-on-foreign-security-principal?forum=winserverDS

  • Replace TESTDOMAIN with the domain you are trying to query
  • Replace Group-XX with the beginning of the group/s you are looking for, it’s a regex expression and you can also customize it to your needs. Alternatively you can remove “,  Value =~ “(?i)^Group-XX” ” and that will list all groups.

Rule 1

Rule 2:

Rule 3:

Rule 4:

Rule 5:


Turn off ProtectedFromAccidentalDeletion From OU and All sub OUs

Windows

If you ever had the task to delete an OU which had Protected From Accidental Deletion enabled on all sub OU’s it can be a pain to manually unchecked for every single one.The easy fix is to run a command to turn off the feature for you on all sub OU’s. To do this we run the following powershell command, just replace the path to your OU and the server, leave the rest as it is:


Update Azure Automation PS Modules at once

Microsoft Azure

Update 19/02/2017

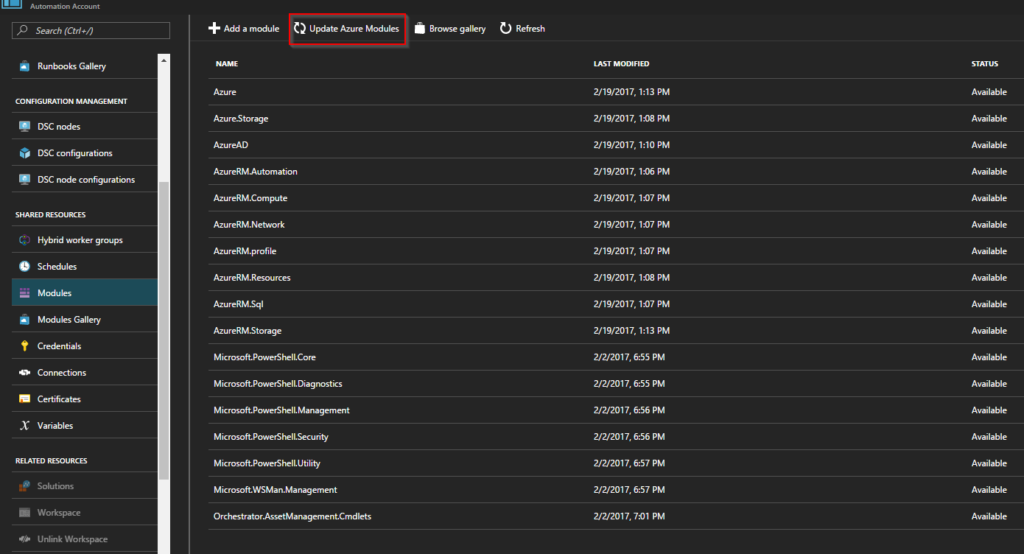
Microsoft has now introduced a new button which updates all modules for you, very easy as shown on the screenshot:


-== Outdated ==-

Now if any of you use Azure Automation you know that updating the Powershell Modules is a pain as they require dependency to be installed first.This can easily take you a whole day to do by hand. However there is a very easy way to this.

The way to update them all including dependency is to run the json template for the AzureRM module. You can find the deploy to azure button and the lates version here: https://www.powershellgallery.com/packages/AzureRM/. All you need to do is chose the subscription, resource and your automation account.

Please note that the file currently does not include all regions and as such you may need to do it manually as described below:

You may need to modify it as the file does not include all regions where automation is available and will fail. You can use the code below to replace the json Automation Account Location section before you run the template:


Configure GitLab SAML with ADFS 3.0

Windows

While setting up gitlab with ADFS 3.0 we noticed there is a couple of gotchas you need to watch out for:

  1. You need to set the NotBeforeSkew to something like 2 in ADFS
  2. You need to trasform the transient identifier in ADFS
  3. idp_cert_fingerprint is case sensitive and needs to be all in CAPS

To set it up follow the following instructions:

In gitlab you need to set the following config

  • Replace the https://gitlab.com with your gitlab address
  • Replace the https://adfs.com with your ADFS address
  • REplace the https://gitlab.local with what ever you like
  • Replace 35:FA:DD:CF:1E:8F:8B:E4:CA:E1:AE:2A:EF:70:95:D5:DC:5C:67:1B with the finger print of your signing certificate


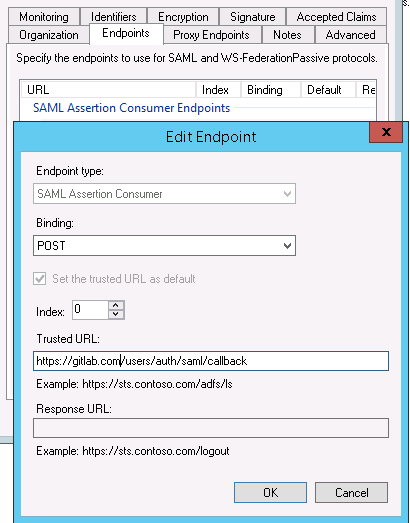
For ADFS configure the following settings (Use the same address replacements as above):

gitlab1

gitlab2

gitlab3

gitlab4gitlab5 gitlab6

Then Run the following command to set the skew in Powershell on the ADFS server:


Custom Script extension for ARM VMs in Azure

Microsoft Azure

Updated 08/01/2017

Due to the lack of articles regarding this topic i decided to do a quick post on how to get the Custom Script extension to work correctly on both Linux and Windows ARM (Resource Manager) virtual machines.

Some very important notes and key differences before we get started

  • For Windows machines
    • The extension details are:
      • $ExtensionType = ‘CustomScriptExtension’
      • $Publisher = ‘Microsoft.Compute’
      • $Version = ‘1.8’
    • When entering the commandToExecute note that in Windows the command is executed from the root of the container. This means that if your script in located in “\scripts\version1\my.ps1” on the blob storage container to run the powershell script you need to reference the full path like shown below. This is because when the agent downloads the files it creates the folder structure the same way as the blob (Do not put the container name in the path!):
    • If you get the directory path wrong this will be indicated by an error in the logs located at “C:\Packages\Plugins\Microsoft.Compute.CustomScriptExtension\1.8\Status”. The error will be something like:
    • The download directory is located in “C:\Packages\Plugins\Microsoft.Compute.CustomScriptExtension\1.8\Downloads”
    • Log file are in “C:\WindowsAzure\Logs\Plugins\Microsoft.Compute.CustomScriptExtension\1.8”. Be aware they are a bit generic for more details errors including errors generated by your script inside the machine by not using throw please check: “C:\Packages\Plugins\Microsoft.Compute.CustomScriptExtension\1.8\Status”
    • If you are using named parameters rather than arguments in your script “eg. -MemoryinGB 100” you need to use the -Command parameter rather than -File, like:
    • If you want your script to tell Azure automation that an error has occurred that’s meaningful make sure you use “Throw” in your script (the one that runs on the machine) as the exit, if you want to catch all messages regardless if they use throw make sure you use try,catch and finally as shown below, this will give you the error messages from “C:\Packages\Plugins\Microsoft.Compute.CustomScriptExtension\1.8\Status” 
    • To get the status you can use the command below. Just specify the virtual machine name, it’s resource group and the name you gave to your custom extension:
  • For all Machines
    • Any files downlaoded are not removed after script has finished executing
    • You can use the “Get-AzureServiceAvailableExtension” to get all the extensions and there current version
    • If you are using Azure Automation scripts and you would like them to fail correctly make sure you add the line below at the top of your code :
    • You can only run a script with the same parameters on a virtual machine once. If yo want to run it multiple times on the same VM you can specify a time stamp in the Setting or SettingString of Set-AzureRmVMExtension
    • If you are using hashtables (and i recommend them) note that a certain format is expected for the fileUris in the Setting of Set-AzureRmVMExtension. Since we can get the extension to download multiple files for us we need to follow the following format:
      • For a Single File
      • For Multiple Files
    • If you want to execute commands with sensitive variables like passwords you can move the commandToExecute to ProtectedSettings or ProtectedSettingString in Set-AzureRmVMExtension. Make sure you only have it in one place (Setting or ProtectedSetting).
  • For Linux Machines
    • The extension details are:
      • $ExtensionType = ‘CustomScriptForLinux’
      • $Publisher = ‘Microsoft.OSTCExtensions’
      • $Version = ‘1.5’
    • When entering the commandToExecute note that in Linux the command is executed from the same folder where the script is located. This is because all files are downloaded to the same folder and blob folder structure is ignored. This means that if your script in located in “\scripts\version1\” on the blob storage container to run the sh script you need to ignore the structure and only specify the file name like:
    • The download directory is located in “/var/lib/waagent/Microsoft.OSTCExtensions.CustomScriptForLinux-1.5.2.0/download/”
    • Log file are in “/var/log/azure/Microsoft.OSTCExtensions.CustomScriptForLinux/1.5.2.0”
    • If you have your own DNS servers and you haven’t set it up to forward for Azure dns queries you might get an error. If you run “hostname -f” and you get errors, you can tell the custom script to skip dns check with the code below in the Setting or SettingString of Set-AzureRmVMExtension. Note that at this stage the script wants a bool variable, looking at the code future versions will take a string.
    • To get the status you can use the command below. Just specify the virtual machine name, it’s resource group and the name you gave to your custom extension:
  • Two important Notes:
    • You can only have one custom extension at a time so you can remove it after you run your script or before with a code similar to the one below:
    • Currently, if the extension is installed it will be re-run every time the VM is Delocated and Started again, to avoid this remove the extension  with a code similar to the one below:


So let’s see some scripts the first is a Windows script which create a dns entry on a Domain Controller:

And here is a Linux script which join a Linux machine to a domain, however this time we don’t want the execution of the script to log the variables we pass to it so we move it to the ProtectedSettings to be encrypted:

Adding multiple UPN/SPN Suffixes via Powershell

Powershell

If you ever have the need to add multiple UPN or SPN suffixes to your forest here is a simple script which will do it in no time. Just add the suffixes to a text file, one per line works the best :).


For UPN Suffixes

For SPN Suffixes


Enable ADFS OAUTH2 for Mattermost 3.0

Mattermost

Since Mattermost released a new version with a lot of bug fixes, features and security enchantments i decided to release a second version for Mattermost with ADFS integration. This is a modified version of the May 17, 2016 stable Mattermost release v3.0.2


The advantages of using ADFS over other methods:

  • True SSO
  • Much more secure then LDAP or gitlab with LDAP
  • Proven for Enterprise

We have also made sure that the following features are available:

  • Other domains and forest can also use Mattermost if invited and a trusts exists
  • Authentication is based on AD SID so if a user is deleted or leaves the company a new user with the same domain username will get a new account with a different username. This is very important as it insures that users are unique and that even if you have two users with the same usernames in different domains they will each get there unique username and not effect one another.
  • Please note that emails do need to be unique, if a user tries to register with an email which is already in the system they will get an error informing them that a user already exists.
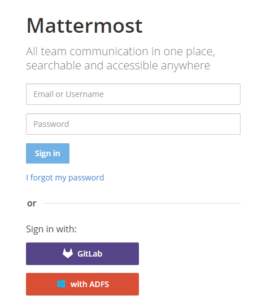
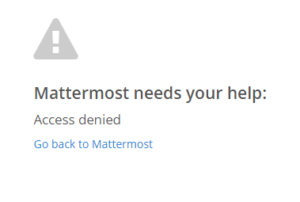
  • Visual error message if user is denied access from ADFS (Added on 21/06/2016)

Here is the guide on where to get it and how to configure it:

adfsm10adfsm9  adfsm3 adfsm4ADFS_Error_Mattermost

You will first need to download/compile and install the new version which can be found below:

You can download the compiled version from form https://github.com/lubenk/platform/releases or here:

Linux: https://gi-architects.co.uk/wp-content/uploads/2016/05/mattermost-team-linux-amd64.tar.gz
OSX: https://gi-architects.co.uk/wp-content/uploads/2016/05/mattermost-team-osx-amd64.tar.gz
Windows: https://gi-architects.co.uk/wp-content/uploads/2016/05/mattermost-team-windows-amd64.tar.gz

You can get the code from: https://github.com/lubenk/platform/tree/ADFS-3.0.2


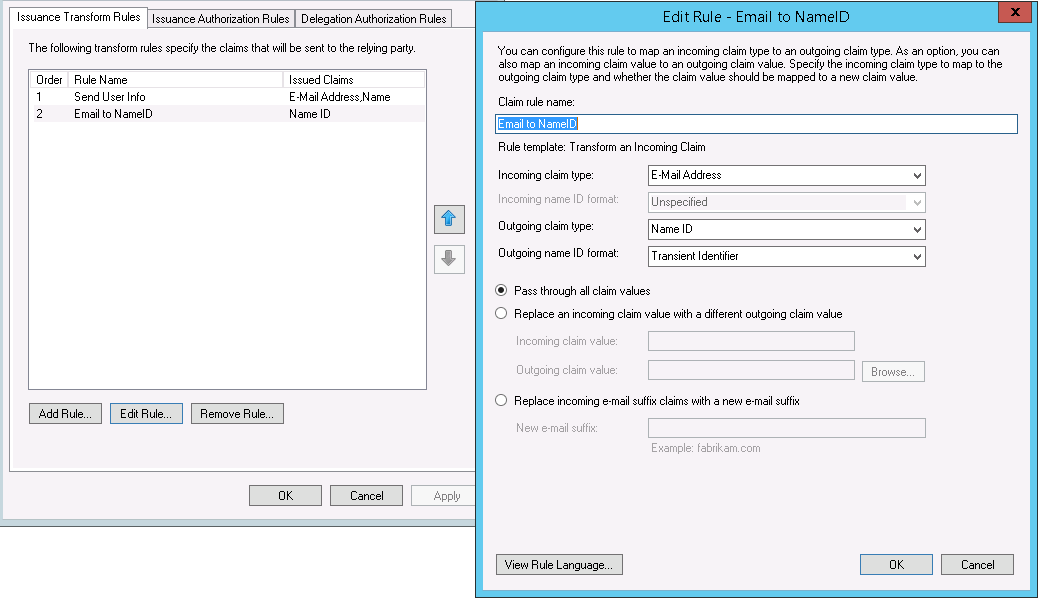
Now that you have a working copy it’s time to configure ADFS 3.0 for OAUTH2.0 please use the instructions on : https://gi-architects.co.uk/2016/04/setup-oauth2-on-adfs-3-0/

with the following additions notes:

ClientID : Just generate one at https://www.guidgenerator.com/online-guid-generator.aspx (please make sure this guid is either more then or less then 26 characters).
Redirect URI : https://mattermost.local/signup/adfs/complete (where mattermost.local is the dns address of your mattermost app)
Relaying party identifier: you can just use your dns address of your mattermost app

The following Claim setup, please make sure the claims are exact, the rules name can be anything:

adfsm7

adfsm5

adfsm8

adfsm6


Once you setup adfs you need to configure mattermost, you can either do this via the config.json or via the admin interface as show below:

adfsm4

Please make sure you copy the public key of the ADFS root CA of your Service Communications Certificate in PEM format (the format that has —-BEGIN CERTIFICATE—- in it) into /usr/local/share/ca-certificates and name it with a .crt file extension, then run “sudo update-ca-certificates”.

You also need the public key of the signing certificate in PEM format somewhere on the server which you will need to reference in the settings.

And that is it you should have a working version with ADFS


Additional Update (21/06/2016)

I have coded in an error checking method if you deny access from the ADFS side so now it will display a nice message as show above.

If you want to configure ADFS to deny access for users based on group or email or other variables you can easily do by:

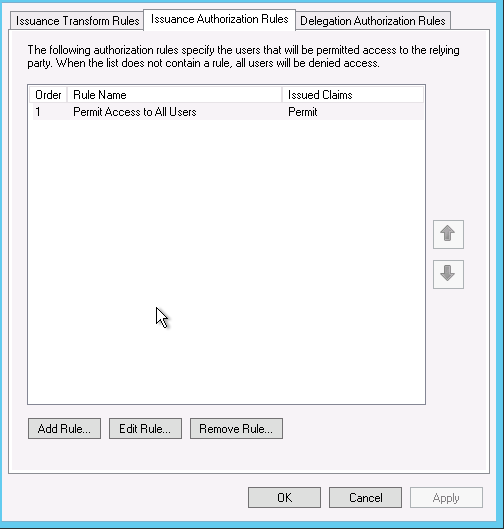
Go into you Mattermost reply party and edit the claims, once in go to Issuance Authorization Rules and delete the default one which permits access for everyone.

adfs_issuance_authorization1

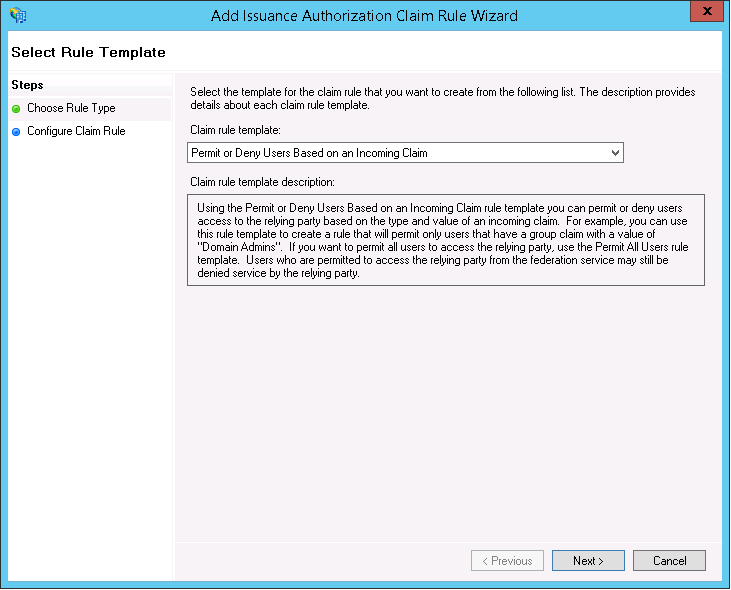
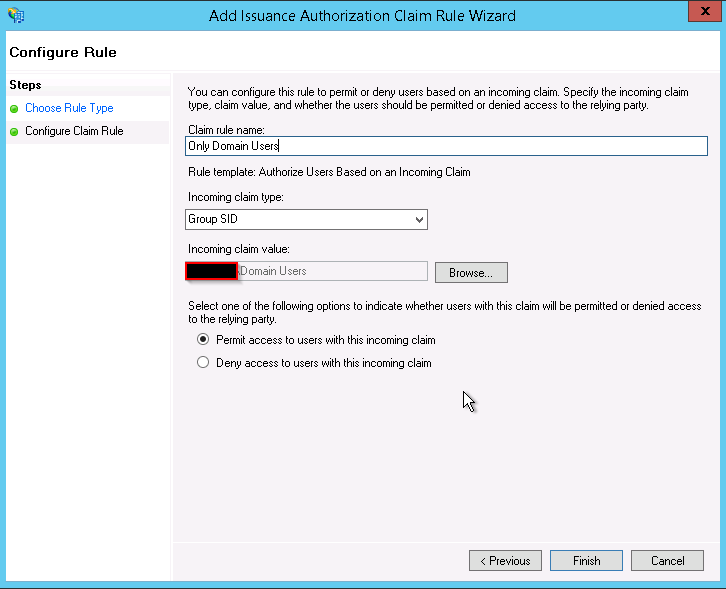
Once deleted add a new Rule based on “Permit or Deny Users Based on an Incoming Claim”

adfs_issuance_authorization2

And chose the type of filtering for example i chose based on group membership and then allow.

adfs_issuance_authorization3

You can create multiple rules as well as create deny rule, just make sure you order them correctly.

Azure Tier Comparison (Benchmark)

Microsoft Azure

So i had some free time and an itch to understand how the different tiers really differed from each other in Azure. It’s important to understand that this is not a comparison against other cloud providers, it’s not designed to show the maximum potential in azure and the results are valid as of 05/08/2016 (most likely will be outdated in 3 months).

To elaborate on the three points above:

  • I wanted to see the differences in terms of performance between the different VM size which Azure offers. I don’t want to compare them with other cloud providers as there are too many variables to considers and will be like comparing apples to oranges.
  • The test i ran where identical for each VM so to show the true differences between them, while i tried to configure the test to get the max performance i can’t grantee that the results i have are the absolute maximum you can achieve nor are they the guaranteed performance you will get when you spin up a VM, especially when it comes to the network results.
  • As with anything the results will probably be outdated in the next 3 months, as Azure replaces old hardware and migrates servers to new more powerful one, prime example would be the network for A series which can now achieve a lot more than the 5 – 400 mbit/s it was initially configured to have.

While the CPU and Ram tests are quite accurate, it was very tricky to get consistent network results due to it’s complexity, i guess that’s why Microsoft do not have official public results of there network and you should in no case take these results as concrete. If you think about it you have different networks over different racks, over different hardware, with Network Security group rules and so on and so on. In my case even creating different machines of the same size showed some slight variation as it most likely was on the other side of the data center. As such i have given the averages by running a lot of tests.

The way i ran the test was to create a G5 machine and install Iperf3 and run it as a server. Then i spun up a VM starting with A0 in the same network, subnet and the same NSG group. I installed Iperf3 and ran it as a client to test against the G5 machines. I ran a few tests (get the average) after which i would change the size instance to the next size up. One thing to stress this is the network speed of the internal network between virtual machines.

I did not post or test extensively the storage io as i found it to be very close to what Microsoft posted (500 iops per normal disk).

Iperf3 Settings:

  • Number of threads: 30
  • Packet size: 2048 KB
  • Test duration: 30 seconds

Software:

  • CPU,RAM Tests: Novabench
  • Disk Tests: Diskspd Utility (superseding SQLIO)
  • Network: Iperf3

Environment:

  • VM OS: Windows Server 2012 R2
  • Location: Azure West Europe
  • Type:  ARM
  • Network: Same Virtual network, Subnet and NSG
  CPU Floating Point CPU Integer CPU MD5 Hashing Ram Speed Iperf Internal Network Test Latency  
OPS/Second OPS/Second Generated/Second MB/s Mbit/s
A0 7,342,245 17,403,189 195,629 2,158 450 2ms
A1 14,356,746 34,109,137 390,896 4,126 1200 2ms
A2, A5 28,304,496 72,205,882 413,747 4,451 2000 2ms
A3, A6 56,267,428 142,505,408 389,636 4,515 2000 2ms
A4, A7 113,955,256 279,482,496 381,127 4,518 2000 2ms
A8, A10 204,486,040 702,109,104 1,009,893 11,731 3200 2ms
A9, A11 409,001,600 1,412,715,328 1,011,888 12,026 3200 2ms
D1 24,268,074 59,110,993 665,754 7,987 2000 2ms
D2, D11 49,442,928 125,056,984 704,646 8,695 2000 2ms
D3, D12 100,603,964 246,954,620 704,402 8,418 2000 2ms
D4, D13 195,991,600 491,080,272 684,456 8,403 2000 2ms
D1_V2 25,528,753 89,765,315 941,641 11,068 2900 2ms
D2_V2, D11_V2 50,998,032 176,682,360 978,454 10,924 2900 2ms
D3_V2, D12_V2 101,907,360 346,187,376 987,393 10,761 2900 2ms
D4_V2, D13_V2 203,695,704 682,719,000 955,868 10,410 2900 2ms
D5_V2, D14_V2 407,601,120 1,405,837,744 939,464 10,247 2900 2ms
GS1 50,991,708 173,447,442 971,055 10,335 3200 2ms
GS2 102,068,092 367,824,420 975,045 10,833 3200 2ms
GS3 204,035,376 696,130,296 977,296 10,070 3200 2ms
GS4 408,175,696 1,421,048,528 980,252 10,551 3200 2ms
GS5 816,471,872 Error 1,013,625 9,734 3200 2ms